How to Move a WordPress.com Site to a Self-Hosted Install
Published by James Parsons • Content Marketing • Posted November 9, 2015 ContentPowered.com
You might think that it’s a simple matter to migrate a site from a hosted WordPress.com version to the self-hosted WordPress.org version, and to a certain extent it is. The problem comes from the various issues you can have with doing steps in the wrong order, skipping a step, or just not knowing what the process entails. Thankfully, it’s easy enough to go over, so I’ll give you a guide to make the whole process easy.
First of all, obviously you have to have a WordPress.com blog, and you have to have a pressing reason to migrate away from .com and into .org. Generally, there are two reasons you want to do this. The first is to have access to more plugins and themes. WordPress.com is very limited, even in their premium expensive tiers, with what you can and can’t include in your installation. The reason, of course, is because it’s all running on a single multisite instance, and that means any plugin installed has to be installed for all users. Rather than allow custom plugins, they just have a fixed set.
The second reason is that you want more control over your content and design. There are a lot of blogs out there that you would never believe run on WordPress.org, because of how varied and how customized they are. The fact is, you can make WordPress look and act just about any way you could possibly want.
Now, if you’re migrating for another reason, that’s fine. Just make sure it’s a good reason, not a redundant reason. For example, if you want a custom domain name, you can do that with WordPress.com, and probably for less money than it costs to buy, maintain, migrate, and care for a self-hosted installation. Remember, all the maintenance tasks right now are performed by WordPress on their .com sites. With .org, you are responsible for doing it all yourself.
Convinced that you want to migrate and set things up yourself? Alright, let’s take a look at the process.
Step 1: Buy Hosting and a Domain
The two elements you need to migrate to your destination are both parts of that destination. One is the web host, and the other is the domain name. Domain name you might already have, if you’ve been using a custom domain name through WordPress.com. If you haven’t, and you still have the .wordpress.com URL, you’ll need a domain name.
Registering a domain name is, thankfully, simple and cheap. I recommend trying to stick with a .com if at all possible, just because it’s the default that many people expect. If you register one of those dotted URL, like bit.ly or del.icio.us, you’re just setting yourself up for people to type in bit.ly.com or what have you. Other than that, you’ll want to consider branding, but there’s really not a lot more to domain names than that. I mean, this post from 2006 is still entirely applicable, except for the bit about keyword domains. Don’t use those.
Hosting is a little more complicated. Years ago, when web hosting was a trickier prospect and running different systems was a matter of compatibility, it was much worse. These days, though, WordPress will run on basically any possible web host you could choose. I recommend something like Bluehost or Dreamhost, but it’s really up to you what you want to choose.
If you’re concerned about the technical aspects, WordPress will require a host that is quick at handling http requests and MySQL commands. There’s not a lot to it beyond that. A good host with a decent architecture and bandwidth should be fine. If you need something more than the basic plan offered by the generic web host, you’ll know it.
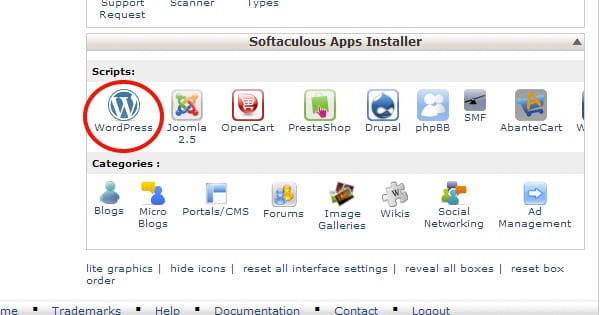
Many modern web hosts understand that one of the number one uses for hosting is WordPress, so they have simple, one-click installs for the platform. If the host you’re using doesn’t have it, you’ll just have to follow the WordPress.org installation instructions. Don’t worry if that website looks hairy; it’s a wiki and covers a lot of different variations. You won’t need everything on the list. Just check either the “Famous 5-Minute Install” section or the “Detailed Instructions” section. Use the rest of the page as reference as necessary. I’m sure your web host representative will be happy to help you set it all up too.
Step 2: Set Up Configuration
At the beginning of this step, you will have a WordPress.com blog with all of your settings, themes, plugins, and content. You will also have a WordPress.org site on your own hosting, with your own domain, and a clean installation of WordPress. What you need to do now is bring your new installation up to parity.
What this means is that you need to install a theme, any plugins you want to carry over, and any new plugins you want to use. It shouldn’t matter if you install more or less than you had before, but I like to recommend that you keep the two sites as close to equivalent as possible to avoid issues. You can always change themes/plugins later, if there’s something more you want to add.
The one exception to this in my mind is a framework like Genesis. Genesis is a revamp of the basic WordPress installation, and it has a ton of advantages over the basic WordPress installation. It’s also tricky to get working when you’re applying it to a custom configuration. Install it first, before you import your data.
By the end of this step, you should have a custom theme and all of the relevant plugins you want, but no content outside of maybe a test post. I also recommend that you explore various settings and set them for convenience.
WordPress.org has a few downsides compared to .com, and the biggest one is that it means you are now utterly dependant upon yourself for security and maintenance. As such, you should take steps to secure your site before you import your content. It’s a narrow window to be compromised and it’s very unlikely, but you don’t want to open yourself up any longer than you have to.
- Make sure any theme, plugin, or framework you choose to use is up to date. If any of them are older than 6 months, consider looking for a version with more recent updates. If they’re older than a year with no updates, replace them or remove them. Security holes can remain un-patched and compromised your site very easily.
- Change the default username and password for your admin account. If the username is default, it cuts the work a hacker has to do in half.
- Change the login path. By default, to log in to a WordPress site, you go to the domain.com/wp-login.php. If you leave this as default, it takes away one step a hacker would have to use. They can’t pick the lock on your door if you have hidden the door itself, right?
- Install security plugins. There are a lot of different security plugins out there, but I recommend at least two; Akismet for anti-spam, and Sucuri for more general firewall and security. You can also use Login Lockdown to help secure your login page. Make sure that’s compatible with your changed URL path first, though.
There are also a bunch of other security steps you can take. Feel free to implement as many as you like. Most small business sites won’t be targeted so heavily that the tertiary exploits are really risk factors, but it never hurts to be a little more secure.
Step 3: Export WordPress.com Content
This step involves only your hosted .com blog, the one where all of your content currently resides. Thankfully, it’s a very easy process. Just log in to your site and go to the WP Admin section. Click Tools on the left hand sidebar and click the Export option that appears. Make sure the “all content” radio button is selected, and then click to download the export file.
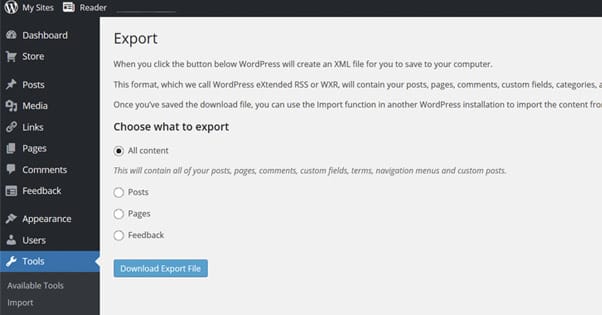
Depending on the size of your blog and how long it has been active, this can take a little bit of time. It’s downloading an XML file of all of your content, including your posts, pages, comments, terms, custom posts, and more. A full download is important here, so you don’t leave anything out or break something in the transfer. This file will be very important, so once it has been downloaded, make sure to back it up just in case. It will save you the hassle of downloading it again if something goes wrong.
Step 4: Import Content to WordPress.org Installation
Now you will need to go to your new clean installation. Assuming you didn’t install anything that rearranged your default dashboard, you will need to go to the same place in this system as you did in your WordPress.com setup. In other words, click on Tools, then Import. Make sure the box for “Download and import file attachments” is checked.
When you click submit, WordPress will ask you for the location of your xml file. Browse to that location and feed in the backup content file, and then just wait. Again, depending on the size of your blog and the size of that file, it can take some time to perform the import successfully. Don’t back, stop, or close the browser, lest you cancel the import midway through. Doing so can cause issues. You will know when the import is complete.
Step 5: Redirect Your Domain
If you’ve been using the default domain.wordpress.com URL for your blog, this change will break existing links pointing at your domain. Or, rather, it will keep those links, but they will be directed at your old site, rather than your new site. If you would like old traffic to visit your new site, you will need to implement a redirect. To do this, you will need to purchase the redirect option from WordPress.com. Yes, I know, it’s one more expense in this whole process, but at least it’s a small fee of only $13 annually. You shouldn’t need it for more than a year or two, after which all old links should be adjusted.
- Go here to buy that redirect.
- Input your new blog URL and click the redirect button.
- Confirm the redirect and its expiration date.
- Perform outreach to existing backlinks to have them change, to minimize the loss of value from the redirect, and the loss incurred from letting the redirect lapse in a year.
If you’ve been using a custom example.com domain that you registered through WordPress.com, you will need to transfer it so that it points to your new web host rather than the WordPress.com site. You can either use WordPress.com to point the domain to your new host, or you can transfer the domain to another host entirely.
Regardless of which option you choose, test to make sure that URLs pointing at your old site end up going to your new site in some way or another. You might need to adjust the permalink settings in WordPress.com, or you may not want to make that change, depending on the redirects you implement.
If you’ve been using a custom example.com domain that you registered through a third party, you will need to point it at your new host as well. Instructions for this can be found with your domain registrar, but will likely be similar to the previous option.
Note: There is an optional step at this point if you made heavy use of Jetpack with your WordPress.com site. If you did, you will want to install the Jetpack plugin on your new hosted version of your blog, and you will want to use the Jetpack subscription migration tool to transfer over your subscribers and the rest of your Jetpack settings.
When I mentioned outreach to change links, this is what I mean.
- Use a backlink analysis tool like Ahrefs to pull a list of every site that links to your site. This may be a long list depending on how old your site is and how many links you had coming in.
- Draft up a form letter that includes a basic greeting to the site owner and an explanation that you have changed the location of your blog.
- Create a custom version of this form letter for each individual website that links to your site. In each, include the URL of each link pointing at your site, and the link itself, including the location if it might be lost among many links. Next to this entry, include the new URL This makes it easy for the webmaster to find the old link and replace it with the new link. The less work they have to do, the higher your success rate.
- Send these form letters out, but only once your new site is definitely up and running. Monitor responses and see how many links change over. Even if those links aren’t necessarily sending traffic, they can still be valuable for SEO purpose.s
Step 6: Hide Your Old Site
If you didn’t implement a redirect, you will probably want to hide your old site so people don’t think you just have a dead blog. Make a post that tells users about your new site, including the URL, and leave it on the front page for a few months. You might consider telling search engines to not crawl this site any more, to encourage them replacing your old site in the index with your new site. To do this, go to Settings and, under the General option, click “Discourage search engines from indexing this site.”
After a few months, or whenever you figure the majority of your traffic has been transferred over, you can hide the old site completely. To do so, go back to that same section and set the strictest option, “I would like my site to be private, visible only to users I choose.” This will hide your site entirely.
At this point, your new site should be up and running. The majority of your traffic should be migrated over. You content is entirely migrated. Your plugins are migrated. Some outreach should have changed existing backlinks to encourage people to link to your new site instead of your old site, and backlinks that don’t change should be written off. There’s nothing more to the process. You’re done!
If you implemented a redirect, you won’t need to privatize your old site. Any user visiting a URL leading to your old site will be sent to the new site just fine. If you need support for any portion of this process, you can find resources here. Your new web host will likely be able to help you with part of the process as well.

James is a content marketing professional who enjoys writing useful content for bloggers. He’s a contributing writer at Forbes, Entrepreneur, Inc, and Business Insider.