How to Write a Great Blog Post in Under an Hour
Published by Drew Hendricks • Content Marketing • Posted May 5, 2016 ContentPowered.com
Blogging doesn’t have to be a time consuming experience. It doesn’t have to take up hours every time you write a post. A lot of the work, really, comes down to proper preparation. Take the time now to invest in a strong foundation, and you’ll benefit in the long run.
Practice is going to be very helpful as well. When I first started out, it would take half a day to write a mediocre blog post. I struggled to come up with topics, I was really picky with the sites I sourced, I agonized over word choice, and I took forever writing every individual post.
You know what I discovered? Most people don’t notice or care about the amount of effort you put into it. A lot of people just skim your posts. Your little plays on words and immaculate, agonized word choice goes out the window. They care about three things.
- Is there information in this post I can extract quickly and use easily?
- Is the post easy enough to read that I don’t have to squint through walls of words?
- Are there obvious typos or misused words that make me lose trust in the author?
As long as you’re on the right side of all three of those points, the rest is gravy. Having a well-tuned tone and voice is nice, but most readers don’t care and won’t engage any better with it.
The caveat here is that those word choices, that voice, becomes more important the more traffic you get. When you’re a higher profile site, people expect you to have a personality and a tone that comes through in your writing. At that point you’re no longer just another blog; you’re a personality they’re coming to see. The advice of skipping all of that time-consuming optimization only works when you’re a small blog looking to build an audience.
On the plus side, the longer you write blog posts, the better you’re going to get at it. Putting out a tuned blog post in under an hour is a real possibility, and once you’ve gotten the hang of it, you can add in all the rest of the optimization and still be under two. You can then dedicate your time to more pressing projects, like running your site and your business, or writing longer flagship content like ebooks or case studies.
This is the general process I use when writing my normal blog posts. It works well enough as a framework, though again, a lot of it comes down to having resources on hand. I’ll point those out as I go, so you can work on establishing them for yourself.
Step 1: Pick a Topic
The first thing you need to do is pick a topic. Ideally, you’ll be drawing on one of your best resources here, which is your ideas document. If you don’t have one, make one. An ideas document should be a spreadsheet with several columns. You’ll want a column of keywords, a column of topics, and a column of title ideas if you have them. You can also have additional columns for sources and notes, if it was a specific post you’re responding to, or some other external impetus.
For now, if you don’t have an ideas document, you’ll want to look around for a good topic. What are other writers in your niche covering? Are there any good trending posts you can write a reply to? Are there frequent questions being asked, either of your company or of your industry? You don’t need a super deep, detailed topic here; basic blog posts don’t need to dig so deep that the reader is surprised they’re not ebooks, after all.
For a normal blog post, I shoot for around 2,000 words. Anything over 1,500 is generally fine, but if you’re aiming for something like 3,000, you’re going to have to be typing really fast if you want to complete it in under an hour. 3,000 words is a solid 50 WPM for the full hour, and that doesn’t give you time to look at your sources or go back and fix errors. For reference, the average typing speed is around 41 WPM, so you’re already pushing it.
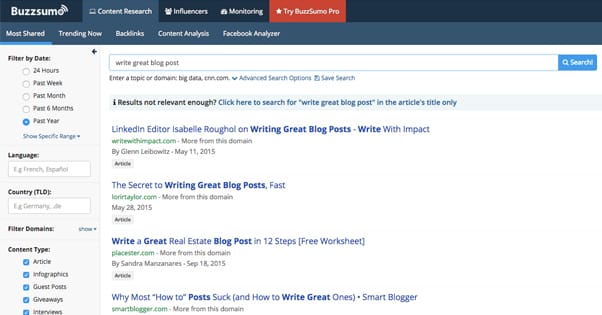
Step 2: Google Sources
The second step is to do some Google searches for your topic. What you’re looking for here is two things; first, anything you can use as a source to support your topic, position, or conclusion. These can be anything from simple infographics about typing like in the previous paragraph, to case studies, to frequently referenced guides. Always try to make sure your sources are at least reputable, though I don’t expect you to check out the credentials of every site you reference.
If you have internal sources, like blog posts you’ve written, case studies you’ve produced, and other such resources, note those down as well. Some of them are fine to just reference without linking, but most of the time you should add a link when you reference information not found in the post you’re writing.
Don’t feel bad if you find another blog that has already covered your topic. That’s not a reason to discard the topic; it’s an opportunity. They’re a perfect source for you to build off of. Look at what they wrote, look at their conclusions. Either agree with them or disagree, it doesn’t matter, but branch out from there. Do what they did, but do it better. Use better sources, draw better conclusions, argue against their proof, or whatever. Just don’t use it as an excuse to drop the topic.
Step 3: Build an Outline
Before you actually start writing, you should build up an outline. It doesn’t have to be very complex; mine aren’t. All it has to do is give you two things; a structure upon which you can build your post, and a narrative flow. The structure is the easy part. Flow is a bit harder.
Flow is what brings you from point A to point B to point C to your conclusion in your post. It’s the logical progression. It’s starting with a question, providing data, and bringing it all to a conclusion that makes sense with the information presented.
My outlines most often tend to be my subheadings, more or less. As I write, I will sometimes reorganize the post and have to edit the subheadings, but sometimes it works just fine the way it is when I outline it. However, I’ve had a lot of practice in putting together that narrative in my head before I write down the outline, so I have the rough idea of what I want before I even begin. Until you reach that point, you may still make mistakes, finding your conclusions falling flat, or finding the post going off in a different direction from what you had planned. That’s fine; so long as it makes sense.
The other purpose of the outline is to make sure you’re not leaving out a critical point you want to make. I used to do that a lot; think of a point I want to mention later, then finish the rest of the post, forgetting to make that point. It often led to me going back to edit in the point, but it turned out disjointed, and made for a lot more work.
Step 4: Write the Post
You have data, you have an outline, now all you need to do is write the post. Flesh out each section. Break longer sections into shorter sections if you need to. If you find that one section seems to come out of nowhere and that there’s not a lot of lead up, add a new section.
I prefer to write in a linear fashion. I start at the start and I write my way through to the end. I cover what needs to be covered along the way. Not everyone likes to write linearly, though, and it’s fine if you don’t. Write sections in the order that works best for you. The trick is, you need to make sure everything flows from one section to the next. It means your first editing is going to be harder, because you need to be sure of those transitions, whereas I just know how they work due to having written them that way.
Step 5: First Pass Editing
Once you have the post written, it’s time for your first editing pass. You’re not a perfect writer – no one is – and you may make typos that slip through even in editing. I know I have; I’ve found typos on posts I’ve published months ago, that no one noticed.
The first pass of editing is generally to make sure there’s coherence between paragraphs and sections, that you haven’t gone off the rails with details or derails that don’t need to be in the post, and that you adequately explain everything you’re writing about. If you make a conclusion and the logic doesn’t necessarily follow from the data, you need to add in something. If you have a three paragraph aside about your dog, it better be relevant, or you need to cut it. If you find a typo or a grammatical error, fix it, but they’re not your focus yet.
Step 6: Craft Meta Data
At this point, I’ve typically grown tired of looking at the same post over and over, so I go and do something different but equally important; making the meta data. This involves two things.
The first is the meta description. I tend to start with this because it’s easier to write than a compelling title; you just need a short reference to what the post is going to be about. Present the question you’re going to answer and tease the solution, but don’t spoil the whole thing.
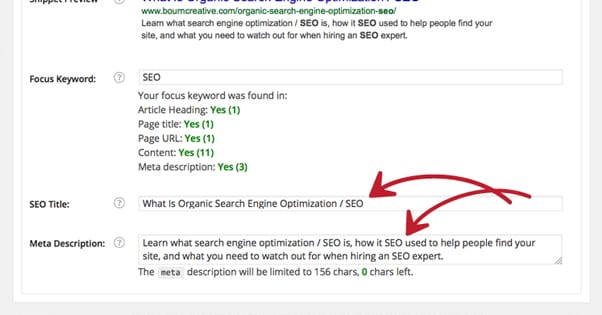
The second is the meta title. Coming up with a compelling title is a pretty big project, and it’s actually the subject of entire posts. It takes a lot of practice, but you can get some idea by looking back at your sources and seeing what other people have titled their posts.
There are other forms of meta data, like image alt text and Schema.org markup that you might want to include, but those require you to have put images and such into your post already. I do that later, so the final meta information comes later as well.
Step 7: Final Editing
The final editing pass is usually done by someone other than myself. Getting someone else to read your post and point out typos, questions, and concerns is a great way to get a second perspective. If you’re working as part of an editorial process, you probably have a lead editor that will either suggest changes or simply make them prior to publication. If you’re not, you might want to have an editor on staff, or a friend you can run the post by.
Final editing is also where you scan the post for typos and grammar errors. These can be tricky to spot, though, particularly after you’ve been writing for a long time. I like to crank up the spelling and grammar check settings on Word, or run it through a web app with all the settings on high, to see what it picks up.
Step 8: Add Links and Images
At this point, the text of your post is done. Ideally, it has been less than an hour start to finish. The rest of the process depends on what sort of editorial process you use. If you send off the text to someone else, congratulations; you’re done. If you have to do the rest of the work yourself, stick around, there’s still some more.
Links are next, in my process. I add links whenever they’re relevant as I write, and go back and add more if I feel a passage needs support, or if I want an internal link that I didn’t have before.
Images are their own issue. You have to either find or create images that fit your posts, but you can’t just go around stealing images from Google image search. I prefer having a graphic designer on staff ready to pump out a couple images for each post, but the costs of that can add up, so it’s obviously not the best idea for everyone.
Step 9: Publish and Promote
Now all that’s left is to fill out the meta data in the appropriate ways and schedule the post. Once it’s up, post about it on your social media and set your promotion engine to work. That’s all outside the scope of writing, though, so you’ll forgive me for stopping here. Ideally, you’ll have done the majority of your work in under an hour using this process. If not, don’t worry; practice and time will make you better at it.

Drew Hendricks is the CMO of Blogpros and a contributing writer to Inc., Entrepreneur and Success.