How to Use UTM Parameters to Track Your Blog Traffic
Published by Kenny Novak • Resources • Posted June 26, 2017 ContentPowered.com
I can guarantee that you’ve seen UTM parameters, probably just about every day. The question is, do you recognize them? Do you know what they do, and what they are? Here, look at two example links.
- http://www.pcgamer.com/overclockers-reach-an-insane-75-ghz-on-intel-core-i7-7740k/?utm_content=buffer217d8&utm_medium=social&utm_source=facebook&utm_campaign=buffer-maxpcfb
- http://www.pcgamer.com/overclockers-reach-an-insane-75-ghz-on-intel-core-i7-7740k/
Both links go to the same destination. For the first 80-something characters, they’re identical. Then you hit “?utm”, which is the start of the UTM parameters. You can remove these from any link you see and the link will still function just fine.
So what do the parameters do? If you look each parameter individually, it can tell you some information.
- Utm_content=buffer217d8. This tells you that the content of the link came from Buffer. It’s likely that PC Gamer’s social media team uses Buffer to curate posts.
- Utm_medium=social. This tells you that the link came from a social source. If I shared the link to you in email and you clicked it, PC Gamer’s internal analytics would show that it originated from the social media link, not from an email link.
- Utm_source=Facebook. This tells you that the source of the visit is from Facebook. The same link, identical in every way except this parameter, could come from any social network. If this parameter was Twitter, it would show the traffic coming from Twitter.
- Utm_campaign=buffer-maxpcfb. This shows the specific ad campaign the link came from. In this case, I pulled the link not from PC Gamer’s profile, but from the Maximum PC profile. This shows that it came from MaxPC’s FB, or Facebook profile, posted via Buffer.
This is all information the average user never needs to see or know. There’s no reason for the average user to care about all of this extra goofiness at the end of their URLs. They just click through and view the content, none the wiser about what’s going on in the URL.
For PC Gamer, though, this is a wealth of information. Each parameter gives data to Google Analytics, so they can see how each campaign is working and how well it’s funneling traffic.
The History of UTM
So what IS a UTM parameter, anyway? Why is it called that, beyond the obvious “it has UTM in the URL”?
The UTM is actually an acronym that stands for Urchin Tracking Module. Urchin was a small software company that created and helped pioneer the field of web analytics. Google, always seeing the wave of the future in the Internet, acquired Urchin in 2005 and revamped it as Google Analytics.
Urchin parameters are used to feed specific types of tags along with data when a user clicks a link and it is recorded in Google Analytics. Rather than “a user clicked a link to go from page A to page B”, it gives more information. It says “that link originated on Facebook, even if the user clicked it via email.” It says “that link was part of one specific ad campaign.” It helps you as a marketer categorize data so you can look at it later and see the general shape of your marketing presence.
Here’s an example of using UTM parameters in a different way. Say you have a landing page to promote your product. There are three different calls to action on that page. One is up near the top, for people who immediately know and want to jump in to converting. One is halfway down the page, after an explainer video and some basic bullet points. The third is all the way down the page, after the fine print and pricing information.
All three of those links lead from the same page A – the landing page – to the same page B, the product page. A user clicking one and a user clicking another will appear the same in Google Analytics. So how do you know which call to action is getting the most traffic?
By attaching UTM parameters to each URL, you can suddenly differentiate it. All of them might have the same UTM Source, the same UTM Campaign, and the same UTM Medium, but different UTM Content. Each one shows up differently, so you can see that oh, interesting, your mid-page call to action gets 3x as many clicks as the other two. You can then figure out why, maybe remove additional information and reposition other calls to action, to adjust performance.
Types of UTM Parameters
There are actually a total of five UTM parameters, though you only actually need to use three. You can use all five if you like, but you absolutely must use three of them. Each one has a different purpose, so depending on your situation, you might want to use them all.
1: UTM_Source. This one is required. It allows you to identify the source of your traffic, such as “social” or “newsletter” or “Facebook.” It’s up to you how broad you want to make it, but generally a more specific source is better.
2: UTM_Medium. This one is required. Different from Source, it allows you to identify the medium that carries the link. You might have “post” or “ad” or “email” or “messenger” as your medium. If you were using Facebook Messenger Ads, for example, you might make the Source Facebook and the Medium Messenger.
3: UTM_Campaign. This one is required. It allows you to give a name to an overall campaign that the link belongs to. If you have three links on a landing page, they would have different sources, the same medium – the landing page – and the same campaign, since they all promote the same product. If you’re promoting different products on Facebook, they might all have the same Source and Medium, but different campaigns.
4: UTM_Term. This one is not required, but can be useful in some situations. Generally, this parameter is used to identify keywords or search queries when you’re using paid advertising. Google AdWords links directly into Google Analytics, so you don’t need it when using them, but if you’re using third party ads – like Facebook, Twitter, or a network like BuySellAds – you can specify the term you’re using. You might be running identical ads on three different search terms; all three ads would have the same source, medium, and campaign, but different terms, so you can tell them apart.
5: UTM_Content. This one is not required, but can be useful in some situations. The recommended use for UTM Content is for split testing. It’s also the recommended use case for the three-links-one-landing-page scenario. You don’t have to adapt different parameters for the situation; you can just use Content and specify that it’s for the top-banner, the mid-link, and the footer-link, or what have you.
It should be noted that, since UTM parameters are part of the URL, you cannot use spaces when formatting them. You have to use either an underscore or a dash to take the place of a space, or not use a space at all if you don’t mind having harder to read tags.
You are also not required to use sensible words and phrases. You could have UTM_Source=a51b22, if you want. This makes it more difficult for the average user to parse your URL and determine what information is being referred in the URL. However, it also makes it more difficult for you to interpret your Google Analytics results. You would have to know what a51b22 means, or have a reference document on hand, which can get messy and gets in the way of quick, accurate reporting.
Creating UTM Parameters
You don’t need to just come up with parameters on the fly and make sure they fit the right categories. Google helpfully has URL builders available to fill out a form and generate a link. There are actually three ways you can do this.
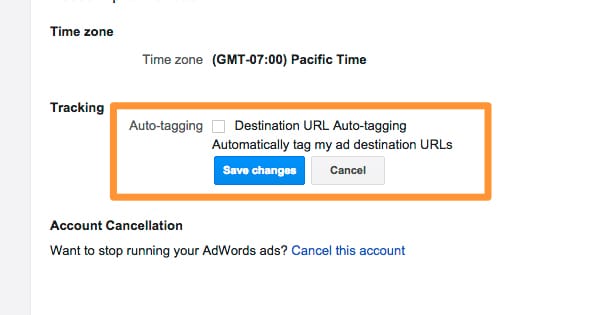
The first way is to just use AdWords. If you’re running ads through Google AdWords, you can enable auto-tagging. Auto-tagging is slightly different from UTM Parameters, though it refers much of the same data. When you enable auto-tagging, the URL a user sees in AdWords will have a GCLID added to the end of it. Your URL might look like www.example.com/?gclid=123xyz. The parameter there ties directly into Google’s systems and refers all of the relevant data without needing to have 3-5 parameters tacked on to the end of the URL. You can read all about it here.
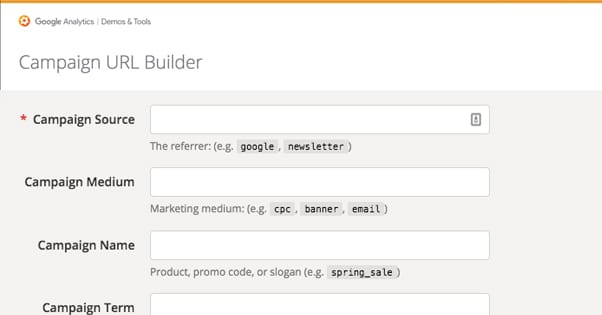
The second method is for web use, ads that aren’t run through AdWords, email marketing, and just about every general use. It’s the standard Campaign URL Builder, found here. With this, you can fill out campaign information and have a link generated for you. You plug in the base URL, the source, medium, name, term, and content if applicable, and a finalized link will be generated for you. There’s even a reference telling you which parameters should be used for what data below the creator, as a quick guide.
As an added bonus, when you’re done, you can choose to use a Google Shortlink to make the final URL shorter. This converts something long and scary-looking into something that looks like https://goo.gl/123xyz. It’s shorter and easier to read, less intimidating to people who don’t understand computers, and fits better in places like Twitter where there are character limits.
The third method of creating UTM links is designed for mobile usage through the Google Play Store. You can find it here. It’s a little different. You have to choose which of the dozen or so integrated ad networks you’re using, or add data for a custom network. You have to put in your application ID, the source of your campaign, and the regular parameters. Then you’re given the URL to use.
When you generate this link, you’re given a link to the Play Store to your app, with the UTM parameters added on. You’re also given a QR code you can save to use for your marketing, which can be very useful for app marketing.
Ideas for Tracking with UTM
There are as many ways to use UTM parameters to track traffic as there are links on under your command. Here are some ideas you can use to monitor your traffic, or adapt to fit your situation.
- Track links in your email newsletters to see where users go. Social links are already tracked in the social network analytics, but traffic leading to your website should be tracked. Each link – I’m guessing you have several – should have tags. For all of them, Medium should be email, Source should be newsletter – or the name of that specific mailing list, if you have more than one – and the campaign should be something to identify that newsletter campaign. When you have more than one link in the newsletter, you can use Content to specify which link is which, so you can track which link people click in the email. Don’t forget to add parameters to links in your email signature, if one is configured!
- If you use site-wide advertising, you might do some configuration to figure out which blog posts and pages are sending the most traffic to your landing page. Use the Medium field for “display-banner” or “sidebar-popin” or “exit-intent-overlay”. Use Source for the page on your site that the traffic comes from, and use Campaign/Content to specify which part of the ad campaign it is, and which split-tested ad is doing the work.
- Track which links on social media are sending traffic to your site. For each link you post, customize the parameters. Use social for the Medium and the name of the network for Source. Use Campaign to specify which ad campaign or content marketing plan you’re using, and use Content to specify which particular post is sending the traffic.
Again, these are just ideas; you can use the parameters for anything you want, and you can track all kinds of information about the traffic flowing between pages, between sites, and between networks. Just remember; it only works in Google Analytics, so you won’t find this data in something like Facebook Insights.


