


One of the big problems with affiliate marketing is how often people are skeptical about links or avoid them altogether. People have become increasingly savvy about recognizing monetized links, and they don't want to feel pressured into a sale. Some platforms don't like people trying to monetize through them either, so various comment sections, communities, and subreddits will outright ban links to certain domains or affiliate networks.
It's not much better to just use a URL shortener like bit.ly. There are two problems with that. The first is that people tend to be skeptical of shortlinks as well. They figure that if you aren't posting the full URL, you have something to hide. This skepticism has only grown over the years, and for good reason - shortlinks have long been used to obscure both monetized and malicious destinations. Bit.ly and similar services maintain lists of domains and keywords they won't allow through their systems, and many platforms will outright flag or block known shortener domains.
The second problem is that there are URL un-shorteners that reverse the process. Anyone willing to visit a site or use a browser extension can peek behind your shortened URL and see exactly where it leads. Many browsers and security tools now do this automatically, making shortlink cloaking essentially pointless for anyone paying attention.
There's also the ongoing problem that many platforms will ban shortlinks entirely, so using one to work around affiliate link bans doesn't solve anything - it just trades one problem for another.
The best way around all of this is to create a custom redirect link through your own domain. Instead of sharing a raw affiliate URL or a third-party shortlink, you create something like yoursite.com/rec/productname, which silently redirects to your affiliate URL in the background. The user sees your domain in the link, which builds trust, and the actual affiliate code is never exposed in the URL they click.
This approach has become even more valuable in 2026 as platforms like Reddit, LinkedIn, and various niche forums have gotten more aggressive about filtering affiliate URLs. A link from your own domain is far less likely to be flagged, and it signals to the reader that you stand behind the recommendation enough to put your own name on it.
There's another important benefit to this structure. If you had a referral code for site A that was example.com/?refid=3259084033, and you share that link everywhere, what happens if you no longer want to recommend that site? What happens if that site rebrands and doesn't redirect their old codes? What happens if your referral code changes? In all of these situations, you would have to search every place you put that referral link and change it. In some cases you may have put it in places you can't edit, so your old link just sits there, broken and useless.
With the URL structure that filters through your site, you can change the destination in the background - the redirect - without having to hunt down every instance of the link you've ever posted. You can easily swap out a referral code, update a UTM parameter, or point to an entirely new offer just by changing one line of code.
So how do you go about setting this all up? Well, first of all, you need to be hosting the site yourself with your own domain and hosting. If you're on WordPress, there are plugins that handle this for you - more on that at the end. This post is focused on how you can set up link cloaking manually to make it easier to promote affiliate offers without exposing your referral URLs.
Key Takeaways
- Raw affiliate links and third-party shorteners like bit.ly raise user suspicion and are often banned by platforms.
- Creating redirects through your own domain (yoursite.com/rec/product) builds trust and hides affiliate URLs from visitors.
- Custom redirect links let you update destinations in one place without hunting down every previously shared link.
- The manual setup requires creating a redirect folder, blocking it via robots.txt, and adding a simple PHP script.
- WordPress users can skip manual setup using plugins like Pretty Links or ThirstyAffiliates for easier link management.
Step 1: Create the Folder
The first thing you want to do is create your outbound folder. This is the yoursite.com/rec/ folder, or whatever you want to call it. It should sit in your root directory, right after the .com or whatever TLD you use. Just create a new folder via your hosting file manager or FTP client.
If you prefer, you can add more than one folder. Nothing stops you from having one folder for each affiliate network, or different folders for different niches. You'll be duplicating a little work because each folder will need its own script, but it's still a matter of copy and paste with a few changed lines.
I recommend keeping your folder name short. You could use /rec/ or /ref/, you could use /out/ for outbound links, or /go/ - whatever feels natural. It doesn't need to be long, but it should be human readable. If it looks like random characters, people will be just as suspicious of it as they would be of a raw affiliate link.
Step 2: Hide the Folder
Now, if that folder is suddenly available for all to see, the illusion breaks. If people can browse in and see all of your scripts, they can tell something is going on, even if most of them won't know what to make of the code.
The real concern here is also search engines. You don't want this folder indexed or appearing in search results. There's nothing malicious going on, but search engines don't love redirection scripts and cloaked links, and having them crawl this folder isn't doing you any favors.
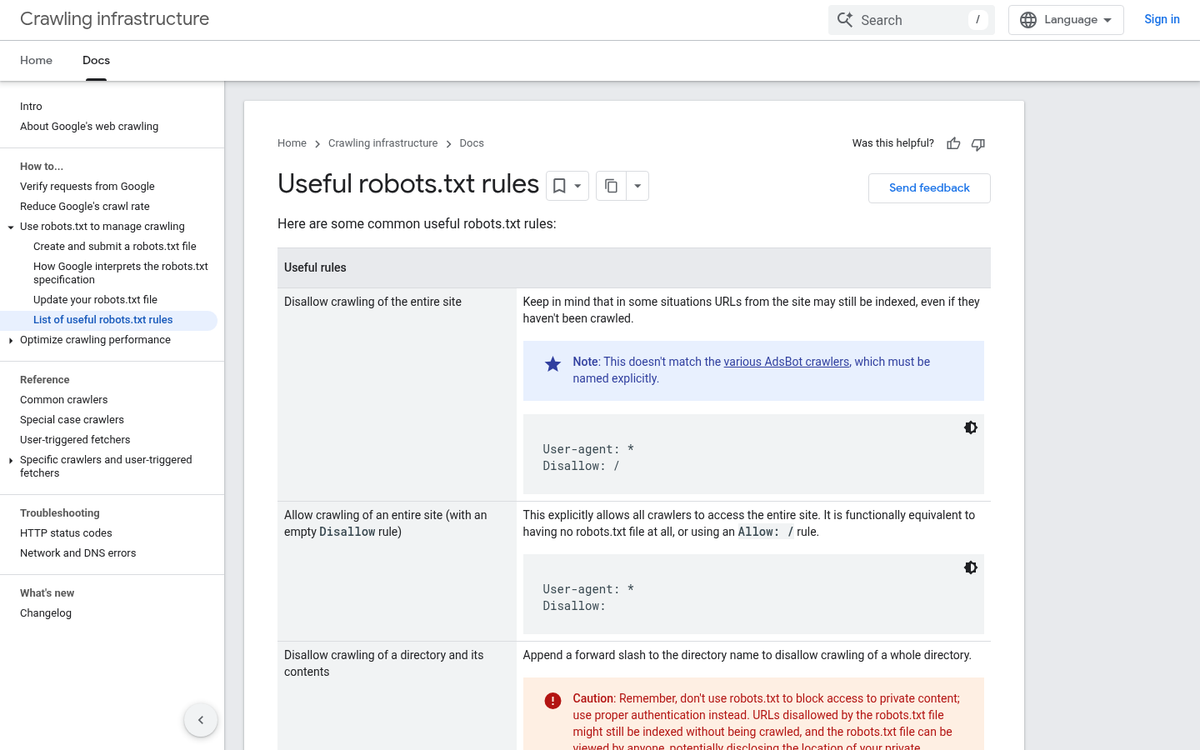
Thankfully, blocking it is quite easy. If you have a robots.txt file in your root directory, open it. If you don't, just create a new plain text file and name it robots.txt. In this file, add the lines:
User-agent: *
Disallow: /out/
Replace /out/ with whatever you named your folder in step one. If you made more than one folder, add a separate Disallow line for each one.
You may already see a few lines in this file if it exists. Folders like /tmp/ or /cgi-bin/ are system folders that are fine to leave disallowed. The main thing to watch out for is to never type "Disallow: /" on its own. The single / indicates the root directory, which would tell search engines to block your entire site from being indexed. That's not what you want. You can also use our Robots.txt AI Bot Checker to verify your file is configured correctly once you're done.
Step 3: Add a Dash of PHP
PHP is a scripting language and it may seem intimidating if you've never touched it, but the good news is you don't need to write any of it yourself. The logic is straightforward: a small PHP script reads a text file containing your redirect mappings and sends visitors to the right destination based on the URL they clicked.
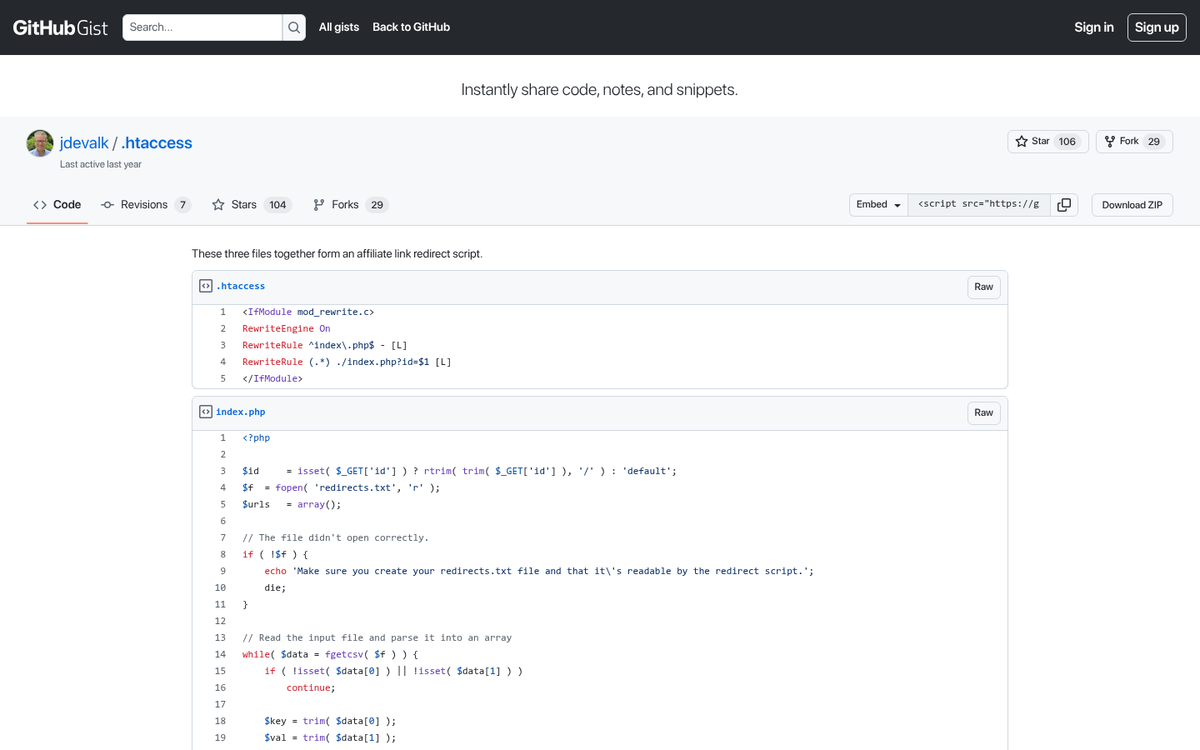
You'll need three files in your redirect folder:
- An .htaccess file that cleans up the URL structure (removes the ?id= parameter so your links look tidy)
- An index.php file that handles the actual redirect logic
- A redirects.txt file where you store all your link mappings
There are several versions of this script floating around GitHub. The concept hasn't changed in years because it doesn't need to - it's a simple and reliable approach. A quick search for "PHP affiliate link redirect script" will surface plenty of options, and most are well commented so you can understand what each part does. You shouldn't need to edit the .htaccess or index.php files at all once they're in place, though if you already have an .htaccess file on your site, you'll need to carefully merge the two rather than overwriting.
Step 4: Edit the Redirects.txt File

The redirects.txt file is where all the action happens, and it's the only file you'll be editing on a regular basis. The format is simple - each line contains two pieces of information separated by a comma:
- The short identifier you want to appear in your URL
- The full destination URL, including your affiliate or referral code
So if you want yoursite.com/out/tool1 to redirect to an affiliate link, your entry would look like this:
tool1,https://example.com/offer?refid=318974981234
You'll also want a default entry that points to your homepage. This catches any broken or unrecognized links and sends users somewhere useful rather than to a 404 or a blank page:
default,https://yoursite.com
That's really all there is to it. Add a new line for each offer you want to promote, and you're done.
Step 5: Use Your New Links
Now that you've gotten the code all set up, it's time to start making your redirect URLs. It's not a hard process, but you'll repeat it each time you have a new offer to promote.
- Sign up for an affiliate program and grab your referral URL.
- Add a new entry to your redirects.txt file with a short, memorable identifier and the full affiliate URL after the comma.
- Use the yoursite.com/out/yourID format whenever you're sharing the link - in blog posts, social media, emails, YouTube descriptions, wherever.
- People see your domain in the URL, trust it more, and are more likely to click.
Any time you need to update a link - whether the offer changed, your referral code was updated, or you found a better product to recommend - just edit that one line in the text file. Every place you've ever shared that link will automatically point to the new destination.
The WordPress Way
If you're using WordPress, you don't need to mess with any of the above. There are plugins that handle everything for you. Pretty Links is the most popular option and has been for years - it's well maintained, regularly updated, and the free version is genuinely useful for basic link cloaking and redirects. The pro version adds click tracking, link rotation, automatic keyword linking, and detailed analytics, which can be worth it if you're doing affiliate marketing at any real volume.
ThirstyAffiliates is another strong option that's specifically built for affiliate marketers. It includes link cloaking, geolocation-based redirects, automatic link insertion, and reporting. It integrates well with most major affiliate networks and has become one of the go-to choices for serious affiliate bloggers as of 2026.
Both plugins let you create clean, branded redirect URLs through your own domain, manage them from your WordPress dashboard, and update destinations without ever touching the links themselves wherever they've been published. If you're on WordPress, either of these is going to be a much smoother experience than managing PHP files manually. You might also want to look into WordPress plugins for building landing pages to maximize your conversions once traffic is flowing.
The bottom line is that whatever method you choose, routing your affiliate links through your own domain is one of the smartest things you can do for both trust and long-term flexibility. It future-proofs your links, keeps your brand front and center, and makes you far less vulnerable to the platform-level link filters that keep getting stricter every year.